HubSpot
Hubspot integration. Connecting your HubSpot account allows you to automate moving your contacts and leads straight into your HubSpot account and your pipeline.
Brand refresh in progress
We recently launched a new brand, so some images and videos may differ from what you see in-product. All workflows and guidance remain accurate while we update visuals.
HubSpot Settings and Mappings
- Navigate to the CRM Setup page in your Account Settings, by clicking your initials in the bottom left corner.
- Following the available options, simply complete your universal settings based on you or your company's preference and you will be ready to start importing directly into HubSpot.
- Ensure you set up all mappings to confirm that all fields you want to send over to HubSpot from Seamless are mapped to the proper fields.
- Please note: Our direct integration with HubSpot comes with pre-set field mapping options, however you can customize to your organization’s unique needs.
- Have each account user in your organization follow the steps below to have their Seamless researched contacts assigned to themselves in your HubSpot CRM.
- Select Settings -> CRM Setup in top right Account Menu in Seamless
- Click the Select Owner drop-down menu as seen below
- You can set up each field to be applied to your entire organization, or lock that setting for your entire organization. You can also set each mapping to select if the data will override in your CRM. To set these fields, simply use the Set Org Wide or Lock Org Wide fields (In Universal Settings + Importing Mappings) as well as Override (In Importing Mappings) as desired.
Import Contacts Individually
The workflow to import contacts individually to your CRM will depend on your preferred Seamless view.
Dynamic Table Layout
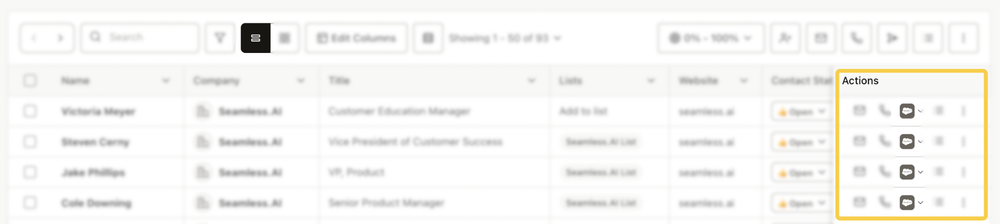
After researching and finding a contact, the Actions column on the right side will allow you to further manage the contact directly on the page you are viewing.
- Locate the contact you'd like to import to HubSpot, either on the My Contacts or Contacts search page.
- Locate the Actions column on the right side of the screen to click the grey HubSpot icon.
- Confirm that the contact imported correctly when the HubSpot icon turns orange.
Card Layout View
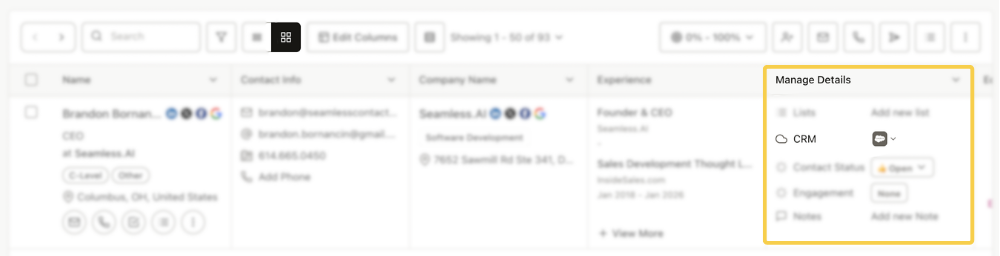
After researching and finding a contact, users are able to import to their preferred CRM in the Manage Details column.
- Locate the contact you'd like to import to HubSpot, either on the My Contacts or Contacts search page.
- Locate the “Manage Details” column to click the grey HubSpot icon in the middle of the cell.
- Confirm that the contact imported correctly when the HubSpot icon turns orange.
Import a List or Group of Contacts
You can import contacts or companies to your CRM from the Search, My Contacts, or My Companies pages by selecting desired contacts/companies or a list and using the three-dot menu in the upper right corner to import at once.
To learn more about importing a group of contacts to HubSpot, check out this article: Importing to CRM
Automatically Import Companies or Contacts to HubSpot
- Login to your account and click your account icon and select CRM Setup.
- Find the setting that says: "Automatically import to HubSpot" and select Yes.
- Once saved, Seamless will now import all companies and contacts immediately when you Find and save those contacts from Seamless or on our Chrome Extension.
CRM Import Mapping Fields
There are pre-populated import mapping fields, but you are able to customize to your or your team’s needs.
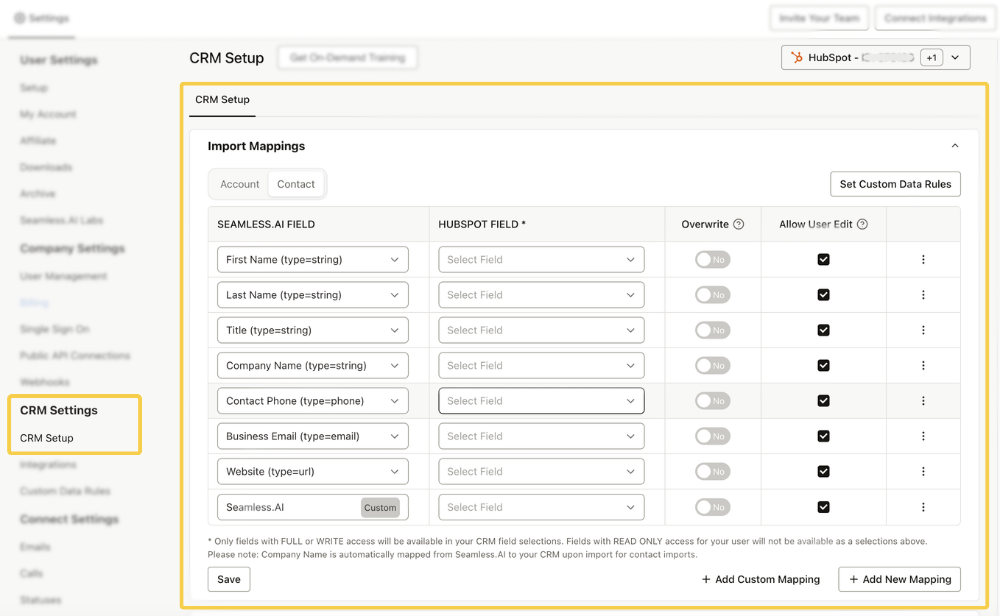
Seamless Field: These fields contain data from Seamless that you've discovered and researched. You can map over 100+ fields from Seamless to your CRM. Initially, Seamless sets up a core set of common fields across CRM users, but you can customize additional mapping fields to suit your CRM needs.
HubSpot Field: These fields mirror the ones in your connected CRM. Seamless regularly polls them to stay current. Just choose the Seamless field on the left, pick the corresponding CRM field on the right, and establish a connection. During import, data from the Seamless field will map to the CRM field and be transferred to your CRM.
Managing Import Mappings
Overwrite:
- If Yes, Seamless will overwrite any existing information in your CRM for this field with the new value from Seamless.AI.
- If No, Seamless will only append/add any information that does not yet exist in the selected CRM field.
Allow User Edit: Allow your Users to edit the specific setting or not depending on if the checkbox is engaged. Note: This is a permission that can be modified by account owners or admins.
- Checkbox on: User will have the ability to edit these settings but the Admin's settings will be utilized as the default setting unless otherwise changed by the user.
- Checkbox off: The fields will not be accessible to your users but are visible in a read only state to allow the user to see how the current setup functions
Edit CRM Mapping: To edit, click the 2 dots on the right side of the row.
- Set a Default Value: If Seamless data does not exist for that field, is there a value you want filled in its place
- Delete Mapping: If mapping is no longer wanted.
Additionally, Seamless provides the ability to Add New Mapping, Add Custom Mapping, and Set Custom Data Rules.
Customizing CRM Import Field Mappings
Seamless lets you control how fields are sent into your CRM during import. You can use standard mappings, create custom mappings, and apply data rules to control overwrite behavior.
Add New Mapping
Use “Add New Mapping” to create a new Seamless-to-CRM field mapping. You can map any Seamless field to any available CRM field.
Note: The connected CRM user must have edit access to the mapped CRM fields. Without the correct permissions, imports may fail.

Pro-Tip
Common use cases include importing additional contact details such as Phone Numbers (1–3) and Email Addresses (1–3).
Add Custom Mapping
Use Add Custom Mapping when you need to send data that Seamless doesn’t provide by default, such as:
- A required CRM field not available in Seamless
- A static value that should apply to every imported record
- A custom field you want to consistently populate in your CRM

How it Works
- Create a custom field in Seamless.
- Set the value Seamless should send (this can be static).
- Map that Seamless custom field to the appropriate CRM field.
Pro-Tip
Create a custom "lead source" in each import, set the Seamless field's static value (e.g., New) and map it to the "Lead Source" field in your CRM. This imports all leads with "New" with a lead source to track in your CRM.
Custom Data Rules
Custom Data Rules let you standardize or correct values before they’re imported into your CRM by replacing a Seamless field’s existing value with an override value. You can apply rules per Contact/Account and optionally enable them org-wide for all team members.

To learn more about Custom Data Rules and best practices, check out this article: Custom Data Rules
Universal Settings

Owner: Enable users to specify the location and source for CRM imports. Customize these based on existing CRM information, and Seamless will retrieve dropdown options by polling your CRM.
Default HubSpot Contact List: Select from your pre-created search lists as default for future searches.
Set Total AI Threshold/Limit on Contact Imports: Use this setting to establish a minimum Total AI threshold for importing contacts. Specifically, it applies to the Total AI score of the Primary Business Email. For example, if the Total AI Slider is set to 80, the Primary Business Email must have a Total AI score of 80% or higher to successfully import on the first attempt.
Contact Account Creation:
- Yes: Seamless can create accounts automatically for contacts not in your CRM.
- No: No account is created; users need to choose an existing account for contact import.
- Prompt: Users are asked to select or create an account with each import.
Auto-Import to HubSpot: Enable this option to automatically import contacts/companies into your CRM when clicking the FIND button in Seamless. By turning this on, you skip the step of manually selecting contacts/companies in My Contacts and My Companies before importing them into your CRM.
Allow contacts/leads to import without a validated email: When set to YES, Seamless permits users to import contacts even without a validated email. A validated email includes a Valid or Accept All response from Seamless's validation during the AI research process.
Allow Users to Create New / Custom Mappings: Allows users, who are no Admin, to create new mappings that will only affect their account
Advanced Settings
Access the Advanced Settings by clicking the "View Advanced Settings" option at the bottom right of the Universal Settings.
Set Contact Import Match Score: Define your match score against your CRM records. A value of 100% requires a contact have a 100% match score against a CRM record to automatically import. Records with a lower match score will show a deduplication screen with "similar record" option to select before importing.
Example: A 95% setting will allow automatic import (no deduplication alert) if there is a match score of 95% or above against a record in your CRM unless there are two of the exact same match scores. (Seamless does not recommend less than 95% Match score for this Setting)
Set Company Import Match Score: Set Company Import Match Score to define your match score against your CRM records. A value of 100% requires a contact have a 100% match score against a CRM record to automatically import. Records with a lower match score will show a duplication screen with "similar record" option to select before importing.
Fill Contact Phone with Company Phone if Contact Phone is blank: When set to Yes, Seamless will add the company phone number to the contact phone field if the company phone has a number and the contact phone is blank. This setting is useful when you want to ensure data is present in both contact and company phones during import, especially if there's field validation in your CRM.
Fill Contact Location with Company Location if Contact Location is blank: When set to Yes, Seamless will populate the contact location fields with the company location if the company has a location and the contact location is blank. This setting is ideal for ensuring data presence in both contact and company locations upon import, especially if there's field validation in your CRM.
Use HubSpot auto-generated companies for contacts: If selected, Seamless will skip over finding or creating a new company record for you when importing contact. This will allow you to use HubSpot’s built-in company generation/assignment based on the contact’s email domain. This feature will only work if you have your HubSpot setup to both automatically create and associate contacts with companies and to automatically fill company properties with HubSpot insights. The contact must also have a recommended or chosen email address on importing. If the contact does not have a recommended or chosen email address, we will use our matching process to best match your contact with a company.
Enable CRM Alerts: Enables checking if leads or contacts already exist in CRM before using Seamless.
Common CRM Troubleshooting
Error with Permissions when Connecting to HubSpot
All users that are looking to connect to HubSpot must have App Marketplace Access. This is a HubSpot requirement and some users may see an error such as the one described in this link. To successfully connect your account, contact your HubSpot Administrator and ask them to ensure you have App Marketplace Access enabled for your account. An error stating "Couldn't complete the connection" seen below may be related to the permissions on the CRM user in HubSpot. Please ensure the following permissions are set in HubSpot in order to import with Seamless.
CRM Tab
- Object access
- Contacts & Companies - View and Edit
CRM Tools
- Import
- Edit property settings (for bulk import matching Seamless records to HubSpot records)
Marketing Tab
- Lists (only if you want to import to static lists)