Single Sign On
This article explains how to set up single sign-on (SSO) in Seamless using the dynamic setup workflow. It walks admins through where to access SSO settings, how identity verification works, how to create a new connection, and how the in-app wizard changes based on the identity provider or connection type selected. It also covers additional organization and login settings available after setup.
Brand refresh in progress
We recently launched a new brand, so some images and videos may differ from what you see in-product. All workflows and guidance remain accurate while we update visuals.
Set Up Single Sign-On (SSO)
Seamless includes a dynamic SSO setup workflow that guides you through configuration based on the identity provider and setup method you choose.
Rather than following one fixed setup path, the in-app wizard adapts to your selections and walks you through the required steps for your provider.
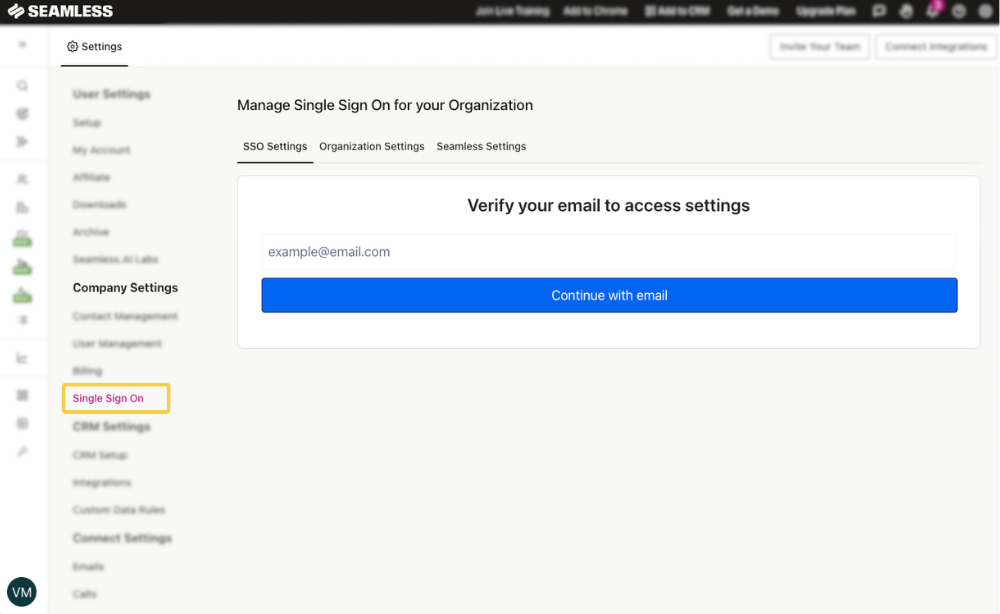
Access the SSO Setup Wizard
To get started:
- Click your initials in the bottom-left corner of Seamless.
- Open Settings.
- Under Company Settings, select Single Sign-On. From here, you can begin creating a new SSO connection.
Within the Single Sign On page, users can manage the single sign on options for your organizations through the SSO Settings, Organization Settings, and Seamless Settings tabs.
How the Dynamic Setup Workflow Works
Create and manage SSO connections on the SSO Settings tab. When you create a new SSO connection, the setup wizard adjusts and seamlessly navigates you through the set up process based on the options you select.
Create a new SSO connection by clicking the “+ New Connection” button in the top right corner.
During setup, you will:
- Verify your identity
- Create or configure your organization’s SSO connection
- Choose your identity provider or connection type
- Follow provider-specific instructions generated by the wizard
- Configure organization-level SSO settings
- Adjust Seamless login preferences
Because the workflow is dynamic, the exact setup steps may vary depending on whether you choose Google, Okta, Entra, SAML, OIDC, or a custom connection.
Step 1: Verify Your Identity
In the SSO Settings flow, begin by entering your email address.
After entering your email, you will receive a 6-digit verification code to authenticate your workflow.
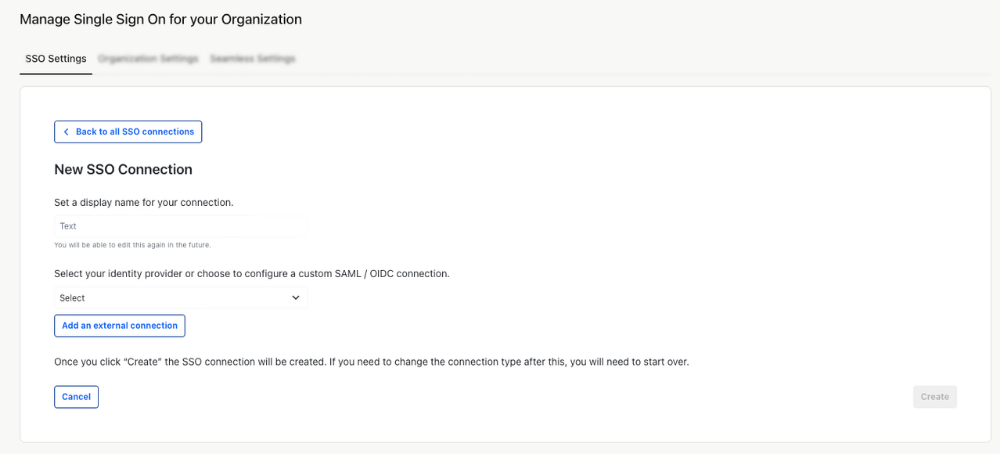
Step 2: Create a New SSO Connection
When creating a new SSO connection, you’ll be prompted to enter a display name for the connection and to select your identity provider or preferred custom setup method.
Supported setup options may include; Google, Okta, Entra, SAML, OIDC, or Custom
After making your selections, click Create to continue.
Step 3: Follow the Provider-Specific Wizard
Once your connection is created, the wizard will display setup steps tailored to the provider you selected.
Depending on your selection, you may be asked to:
- Create an application in your identity provider
- Copy information from Seamless into your provider
- Copy information from your provider into Seamless
- Enter items such as URLs, endpoints, credentials, or other authentication details
- Upload required configuration details
- Complete provider-specific authorization or mapping steps
Because this is a dynamic workflow, users will not all see the same screens or fields. The instructions shown in the wizard are based on the connection type selected during setup.
Step 4: Complete and Save the Connection
Once all required fields are completed, finish the setup in the wizard.
After setup is complete, your configured SSO connections will appear in the SSO Connection section, where you can review and manage them.
Additional Organization Settings
After creating your SSO connection, you may have access to additional organization-level controls.
These settings can include:
- Authentication settings
- User onboarding controls
- Automatic onboarding options
- Automatic role assignment
These options help you define how users are provisioned and authenticated after SSO is enabled.
Seamless Login Settings
Within Seamless Settings, you can also control how users are allowed to log in.
For example, you may have the option to disable manual login
This is useful if your organization wants to fully enforce SSO-based authentication.
How to set up Okta SSO
- Install the Seamless.AI application within your Okta organization.
- You can do so by searching for Seamless.AI inside the Applications catalog.
- Click Add to install Seamless.AI into your Okta organization.
- Inside General Settings of the Seamless.AI application, add users or groups of users to the Seamless.AI application under the Assignments tab. You must add yourself here to finish the installation process.
- Go to the Sign On tab in Okta under the installed Seamless.AI application. Keep this open in another tab or window, as you will need it in the next few steps.
- Go to Single Sign On tab under Settings in Seamless.AI in a different tab or window.
- Click Okta option at the top.
- Copy and paste the Client ID and Secret from the Okta Seamless.AI application into the respective fields in the modal that you just opened up. Enter your Okta domain as well in the Okta domain field. Your domain can be found under the General tab of the Seamless.AI Okta application.
- After all the fields are filled out, click on the Connect Okta button. Your Seamless organization members should be able to connect via Okta now as long as they are in your organization.
- If for some reason the Seamless.AI member’s email address doesn’t match their Okta email address, you can add their Okta email address in the Edit Member popup on the User management page.