Email Connect Overview
Learn how to streamline your outreach with our email fun. From setup and customization to tracking, bulk emailing, and performance insights, everything you need to master email engagement is now built into the platform.
Brand refresh in progress
We recently launched a new brand, so some images and videos may differ from what you see in-product. All workflows and guidance remain accurate while we update visuals.
We’re excited to introduce our new Email Feature, designed to make your outreach more efficient and effective. Now, you can send, track, and manage emails, right from the platform.
Getting Started with Emails
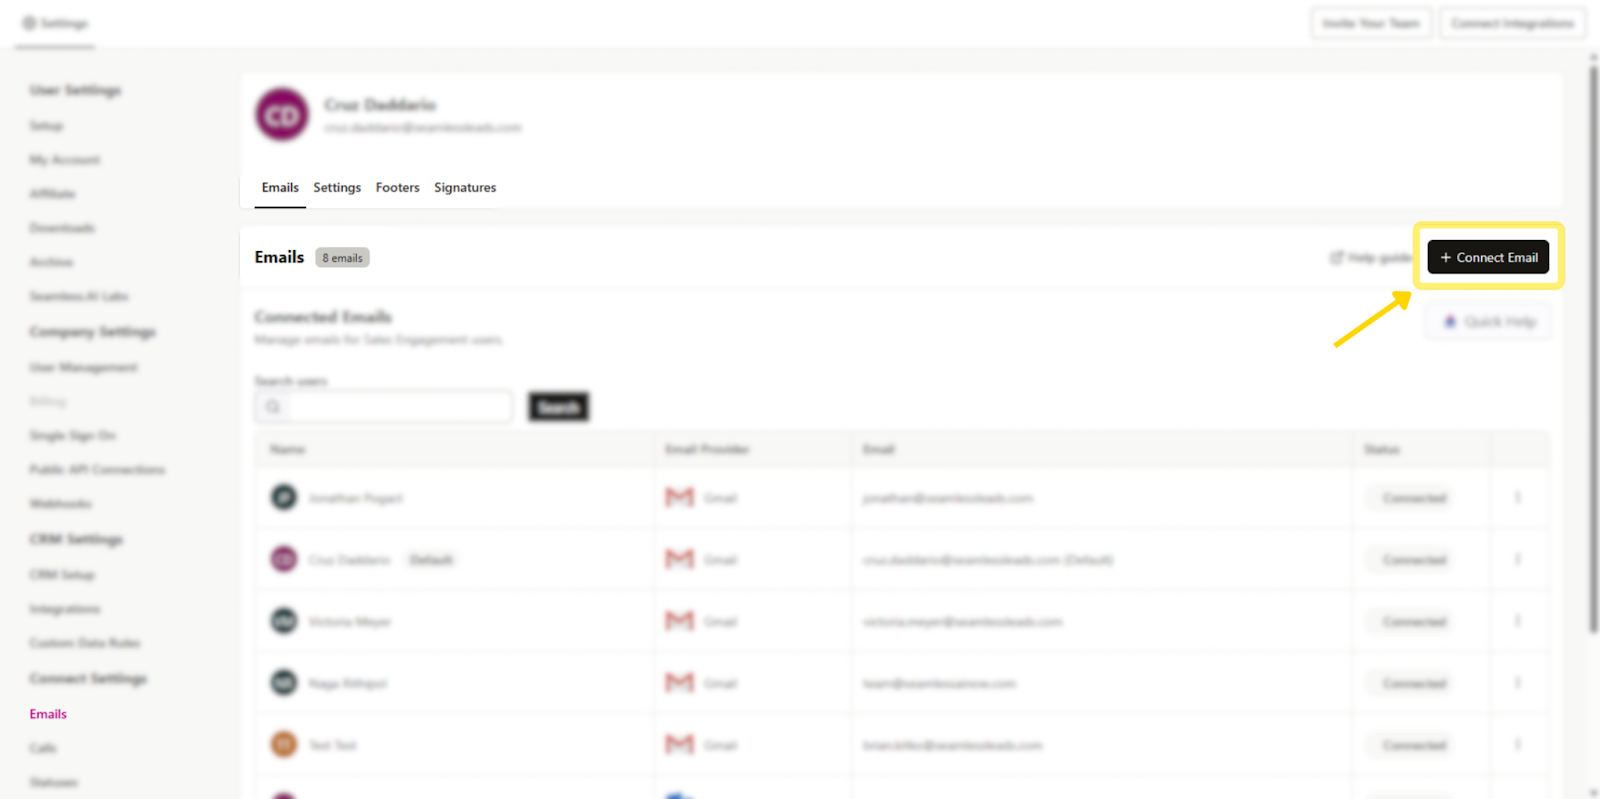
To start using the email functionality, you’ll first need to connect your email through Gmail or Outlook integration. Simply navigate to Settings by clicking on your initials in the bottom left corner or the gear icon in the top right corner of the app. From there, go to Emails under "Connect Settings" and follow the prompts to link your email account.
Customizing Your Email Settings
Email Settings
With Connect email, users have the ability to customize their settings to optimize their email outreach while maintaining compliance. Here’s a breakdown of the settings you can configure:
Daily Send Limits: Users can customize the daily send limit per inbox. It is strongly recommended to set the limit at 250 emails per day, but does have a maximum of 1000 emails per day. The admin can decide if this limit is adjustable by other team members.
Email Delay: To help prevent inboxes from being flagged as spam, users can set a delay between emails. It is recommended to set a minimum of 60 seconds. This setting can be locked by the admin or made editable by team members for added flexibility.
Domain Exclusion List & Blacklist
- Domain Exclusion List: Prevents users from connecting emails from domains. This is used if you don’t want your team to connect certain inboxes or domains to Seamless.
- Domain Blacklist: Prevents emails from being sent to specified domains across the organization.
Preferred Email Sending Hours: Users can define their email-sending business hours, setting a start time, end time, and time zone.
This creates a window for when emails are to be delivered to a contact as well, during their respective timezone. An additional option to allow or prevent emails to be sent to contacts outside of their business hours. This means if a contact in EST is sending an email at 10am their time, it would not be delivered to someone in the PST until they have entered their respective working hours.
There’s also an option to restrict team members from sending emails outside of these designated hours.
Email Tracking: Enable tracking for: emails sent, emails opened, email replies. This setting helps to establish open tracking for the Activity page.
Default Font Settings: Users can set a default font and size for all outgoing emails.
Notifications: Turn on in-app notifications for: sent emails, failed email sends, emails sent outside of business hours, emails below a certain AI Threshold.
Select Email Types to Use in Connect: Set allowed email type(s) to include when sending emails to contacts.
Users can choose whether they want the option to email the Contact Email Only, their Company Email Only, or the choice of Contact and Company email.
Total AI Score: Users can set a Total AI Threshold for outgoing emails. This includes:
- Setting a minimum threshold to prevent emails from being sent to email addresses below that threshold.
- Setting the preference notifying the sender if an email is being sent to an email that is below the set threshold, or to simply block those emails from being sent.
Set Priority Order of Data in Connect: Set preferred order of a contact’s email(s) displayed and used. For example, would you prefer emails to be sent to their company email prior to the option for sending to contact email.
Interested in learning more about Email Settings? Check out these helpful articles: Setting Up Email Engagement and Email Settings
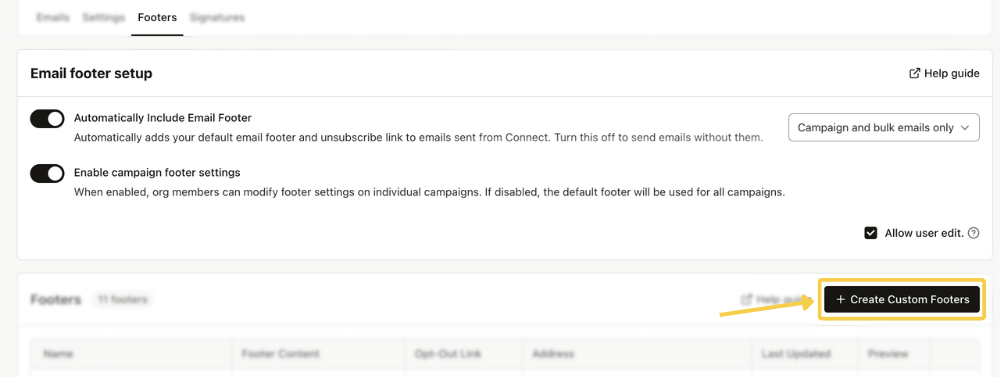
Create Your Footer
Footers are required to be added to any email sent in bulk or automated as part of an email campaign. Create a new footer by clicking, “Create Custom Footer.”
Footer Setting Preferences - Users can customize when email footers are included and customized for campaigns.
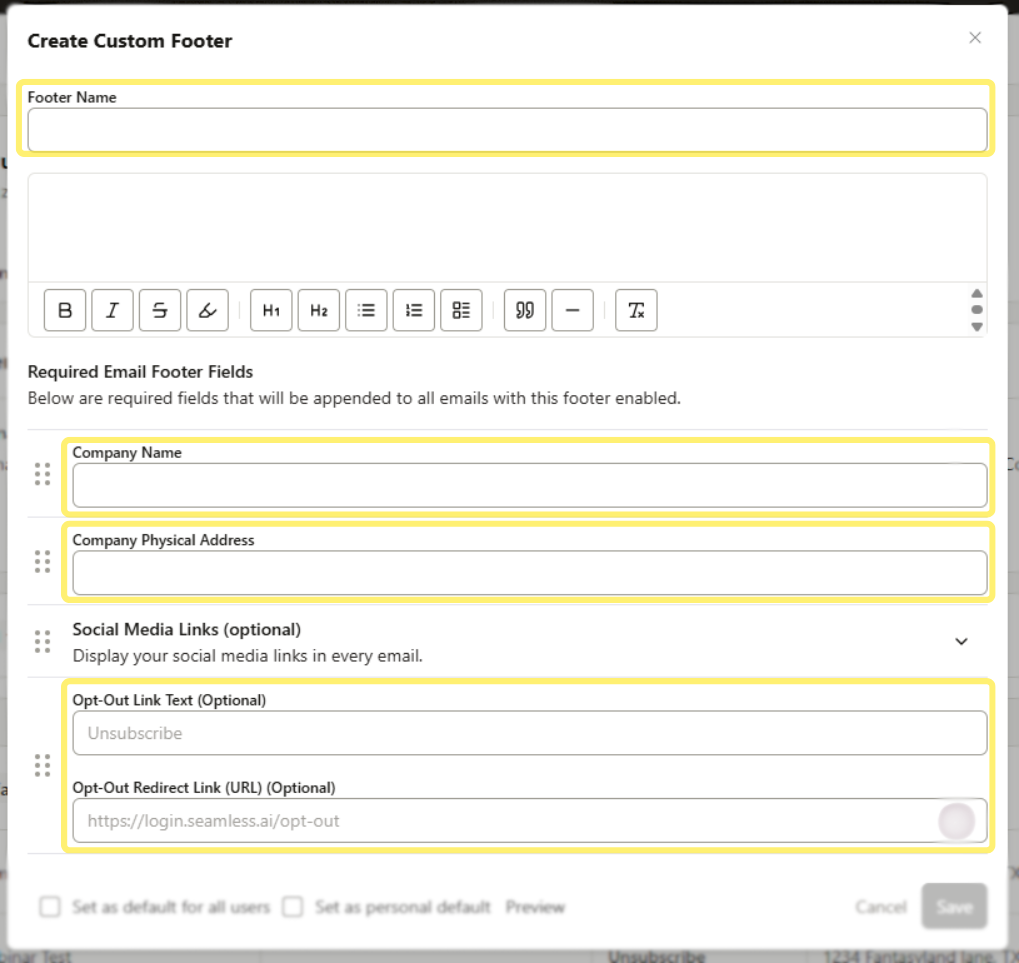
Required Email Footer Fields Include:
- Company Name
- Company Physical Address
- Opt Out Text and Link - Seamless provides an opt out link for you by default. However, if your organization has their own opt out link, you can use that one to overwrite the option Seamless provides.
Set a Footer as default. Seamless Owners and Admins have the ability to set a Footer as default for their other users.
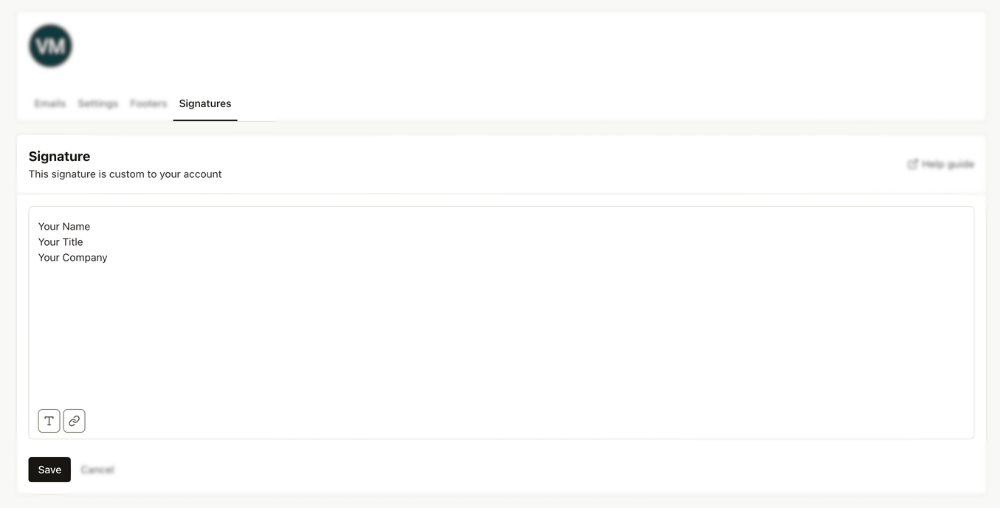
Signature
You also have the option to create a custom signature, under the Signature section, which will be automatically included in all outgoing emails. At this time, Seamless only supports text based signatures, and does allow for including companies logos, images, etc.
Composing & Sending Emails
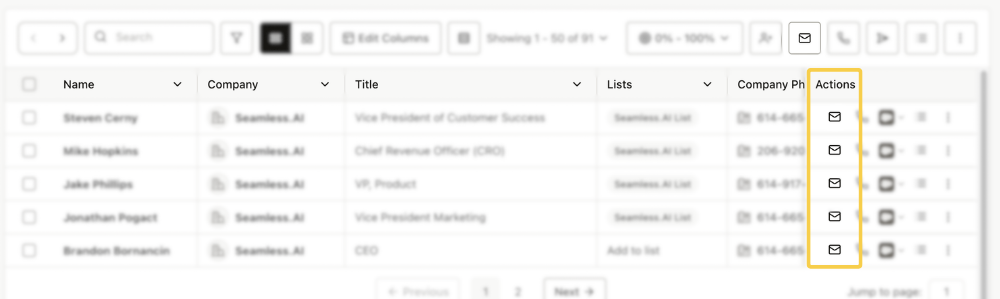
Sending an email is an easy experience within the platform. To email a contact, locate them in your contact list and click the email icon under the "Actions" column. This will open the email module, where you can craft your message while keeping key recipient details visible.
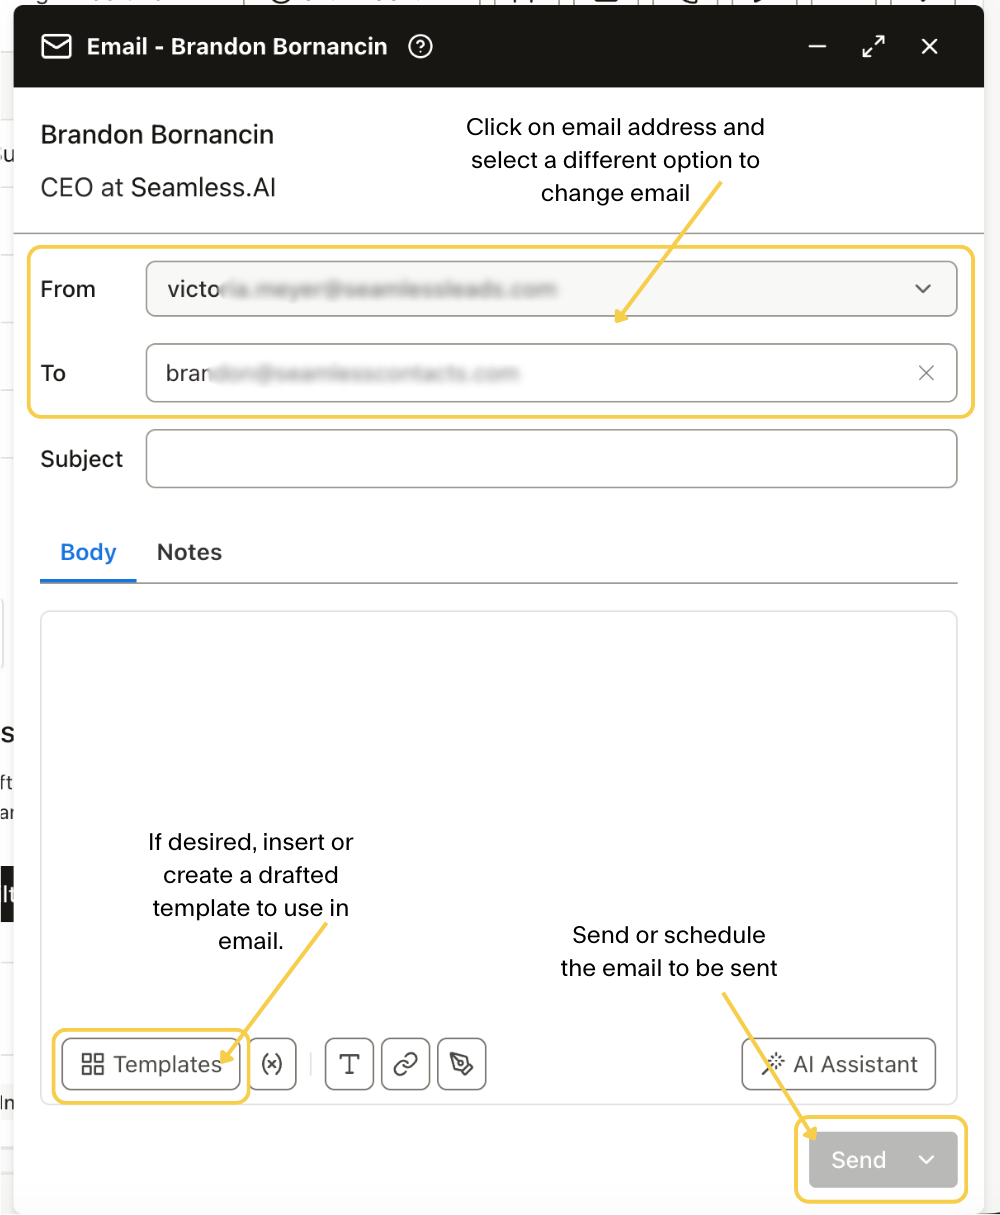
Within the compose module, you’ll have access to essential information about your recipient, including their name, job title, company, and local time zone. This allows you to time your outreach, ensuring your emails land in their inbox at the right moment.
When drafting your message, you can choose which email address to send to and from. To change the preferred email, click on the displayed email and you will see the available emails appear, click the preferred email. You’ll have full control over crafting your subject line and body text. If you prefer a pre-written approach, you can load a saved email template to streamline your messaging.
You have the flexibility to format text and insert hyperlinks. Once your message is ready, send it immediately or schedule it for a later time. Schedule an email to be sent by clicking the ^ icon next to send, ensuring it reaches the recipient when they’re most likely to engage.
Tracking & Managing Emails Activity
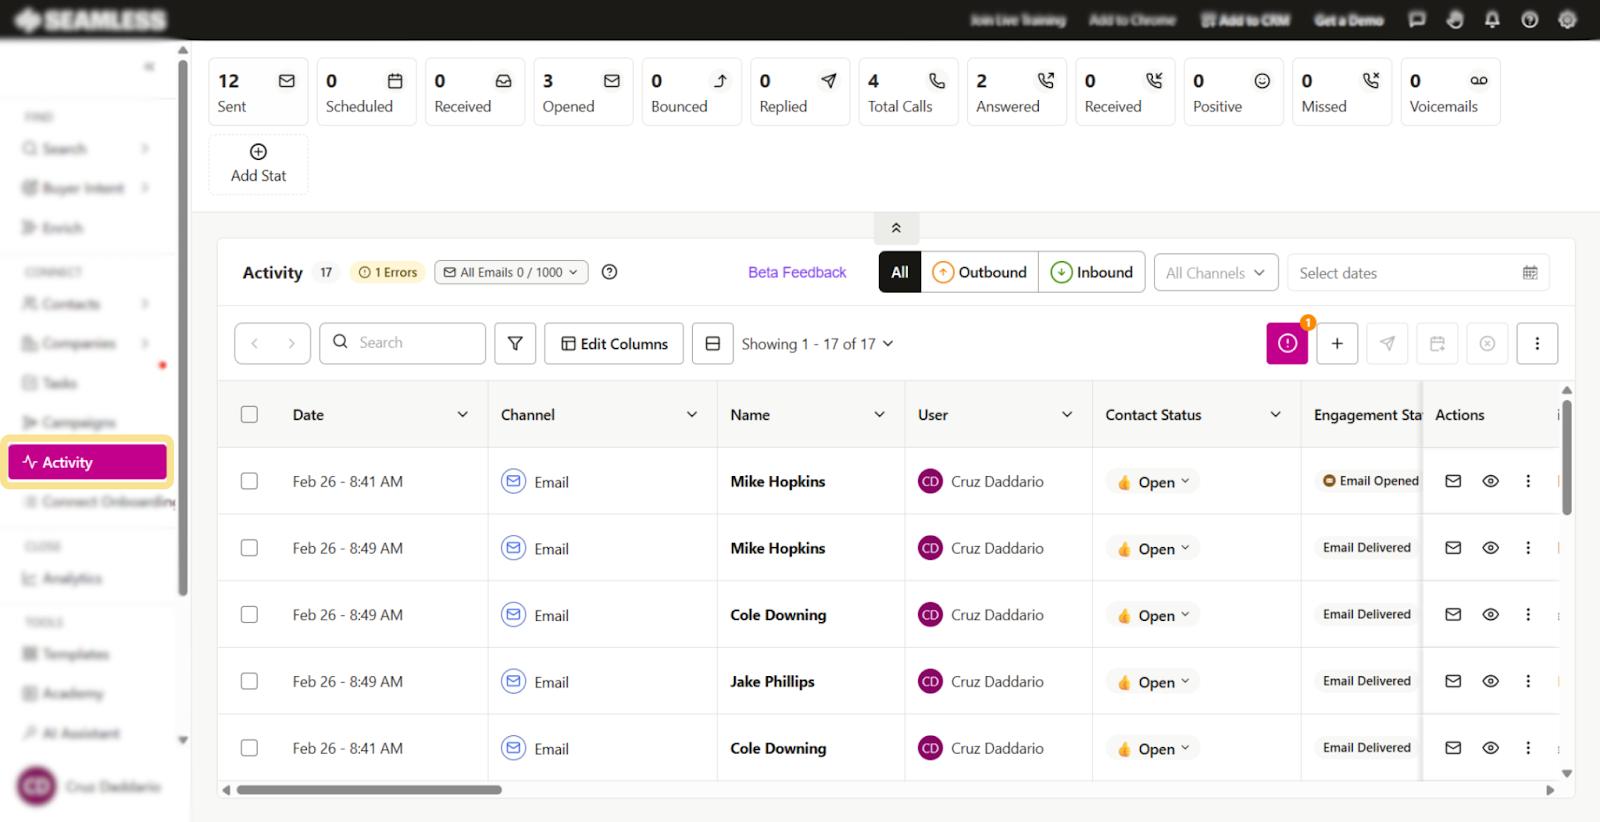
The Activity page serves as your command center for tracking email engagement. Emails sent through the platform are logged here, giving you insights into your outreach.
Within this page, you’ll find a detailed breakdown of your email activity, including the total number of emails sent, scheduled to be sent, received emails, emails opened by a contact, and replied emails.
Each logged email entry provides recipient details, subject lines, timestamps, and engagement status. Whether you want to confirm an email was opened or manage inbound emails that need follow up, the Activity Tab provides full visibility into your interactions.
To maintain accurate records, you also have the ability to log email activity manually, ensuring that all your interactions are documented. Additionally, you can update a Contact’s Status to reflect their progress in your sales pipeline, helping you stay organized and proactive.
The Activity page is fully customizable. The Edit Columns option allows you to adjust the displayed columns of information to fit your workflow. You can tailor the view to display the most relevant information for your needs.
Managing Email Tasks in the Tasks Dashboard
Email-related tasks can be efficiently managed from the Tasks page, giving you a centralized space to schedule, track, and complete email outreach activities.
Email tasks are created automatically as part of an active campaign, or tasks can be created manually for a contact. To create a task, you will click the “+” button, then select Email as the task type, assign a contact, and complete the additional fields.
Once saved, email tasks appear in your Tasks Dashboard. Users can filter, organize, and queue them up using the Start Tasks button. Completing email tasks will launch the email editor modal to begin editing and sending messages.
With detailed filtering, tagging, and progress tracking, the Tasks page ensures you stay organized and consistent in your follow-up efforts.
To learn more about Tasks, check out this article: Creating and Managing Tasks
.png)
Enhancing Your Workflow with Bulk Emailing
Use filters or manually select contacts from My Contacts, then click the Email icon in the top-right corner of the table to open the 3-panel Connect experience. Your selected contacts will be queued for email outreach. If no contacts are selected, all contacts will be auto-selected.
.png)
After opening the 3-panel Connect bulk email experience, you can choose an existing template or create a new one. Then click Preview to check that dynamic variables populate correctly and review each message alongside the recipient’s profile before sending.
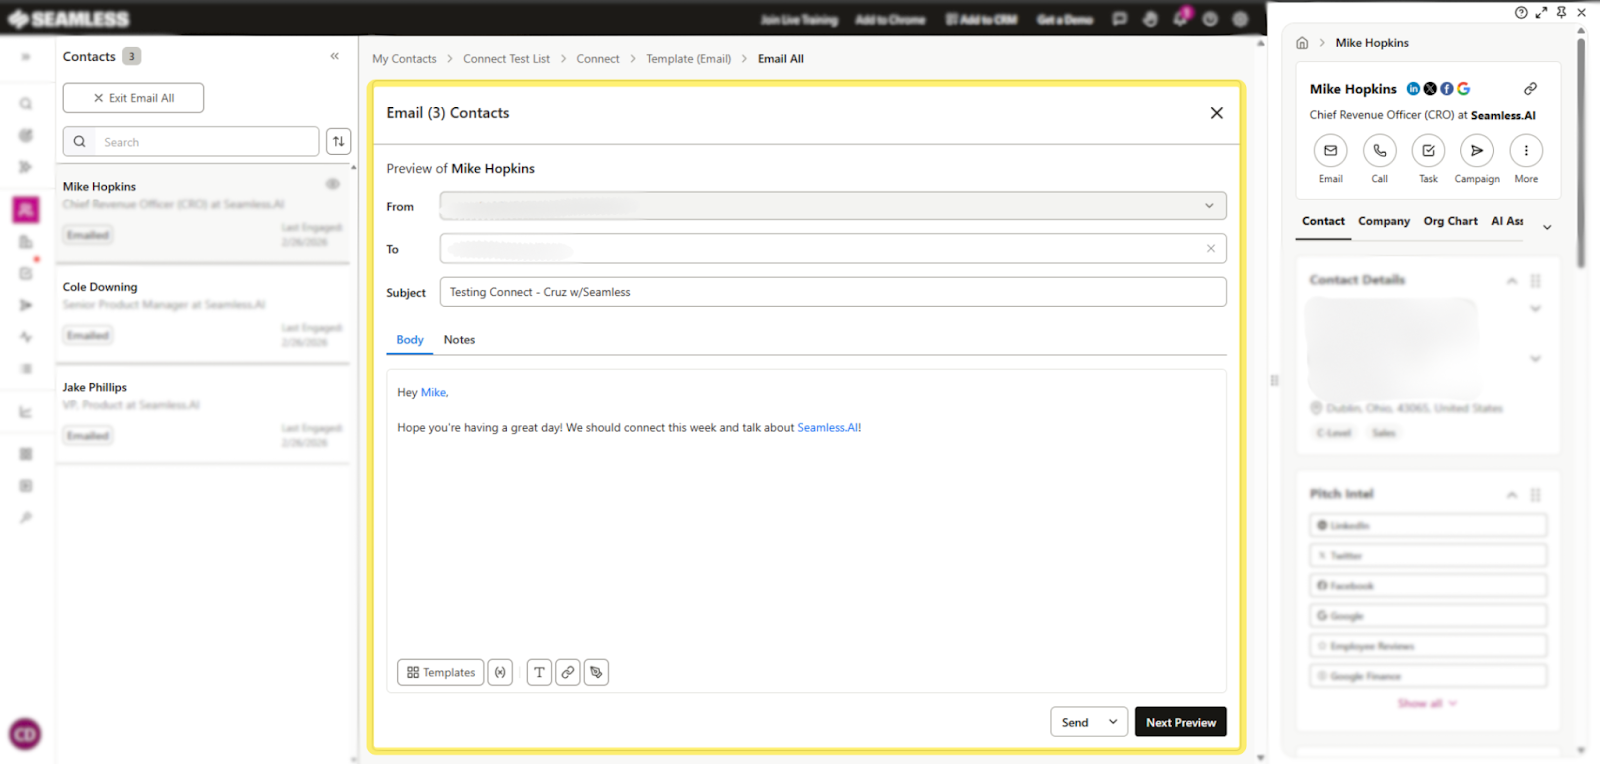
When you're ready, you can:
- Send to the current contact
- Send Test Email to yourself
- Send All to deliver all queued emails
Before sending, choose the email address you want to send from, then select Schedule Emails to send later or Send Emails to send immediately.
Setting Up and Using Email Campaigns
The Campaigns feature in Seamless allows you to automate and scale your email outreach through customizable, multi-step sequences.
To create a campaign, navigate to the Campaigns page, click + Create Campaign, and set your campaign name, contact list, email sender, tags, and schedule.
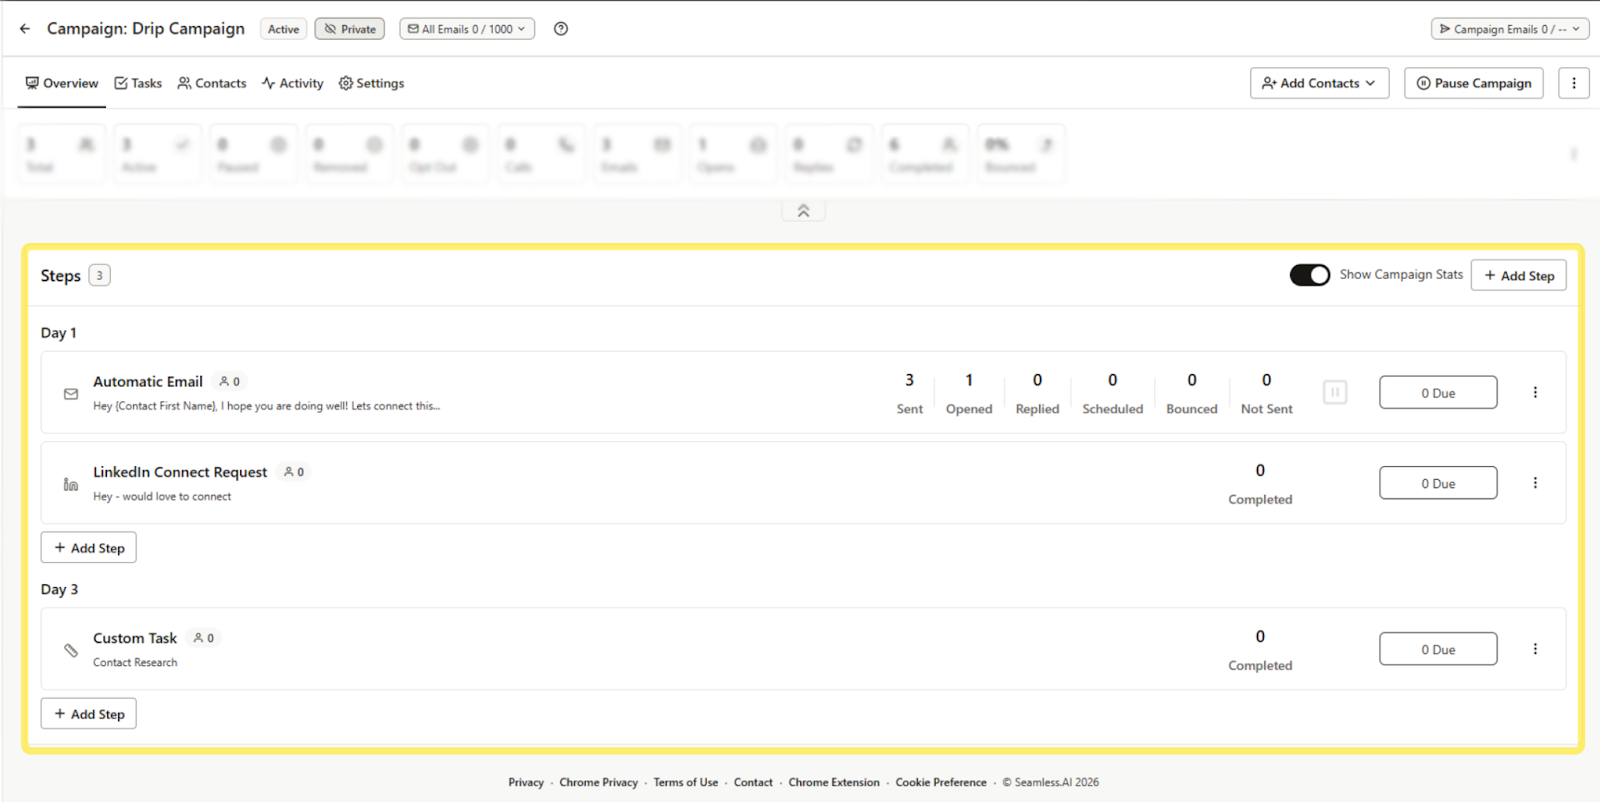
Once created, you can add steps like automatic emails, manual calls, LinkedIn actions, or custom tasks, each assigned a specific day, template, and priority level. After finalizing your steps, launch the campaign to begin outreach; automated steps will run on schedule, while manual tasks will appear in your Tasks dashboard.
You can track engagement (opens, replies, etc.) in the Activity page and adjust messaging as needed to optimize performance.
Getting started building your first Campaign today to learn more about Campaigns, check out this article: Creating and Launching a Seamless Campaign